# Quantization
***
Now comes the part where we will compress the YOLOv3 model. This compression is needed to fit the PYNQ-Z2 board as I said millions of times, I know ... We will specifically execute a process called quantization which reduces the bit-width of the weights or activation's of the Neural Network. For the PYNQ-Z2 we will have to limit these values to 8 bit since that's the maximum width of the channel connecting the PL to the PS.
To allow DNNDK to perform quantization on the YOLO model, we need to configure a quantization script. First, we will be talking about some specific parameters and then I will show the rest of the script and teach how to complete it.
The first thing to know is the input and output names on this network. To do this we will use DECENT\_Q to run an inspection on the model so we are given the required information. Insert this code on the terminal and change the path of the model according to your implementation:
```
cd ~
cd /home/andre/Desktop/YOLO-on-PYNQ-Z2/DNNDK/model_conversion
decent_q inspect --input_frozen_graph=model_data/yolo.pb
```
You should have a similar output like this one I got. Remember to ignore the numpy warnings, it is just related to the fact that we are using a older version.
DECENT_Q inspection output
As you can see, the inspection resulted in one input called "input\_1" and 3 outputs called "conv2d\_59/BiasAdd", "conv2d\_67/BiasAdd" and "conv2d\_75/BiasAdd". The second part of the image refers to the inspection of Tiny YOLO - a simplified version of YOLOv3 and you can clearly see that the number of outputs is smaller enphacizing the fact that this Neural Network is smaller than the YOLO we will be working on.
From the inspection output you can also see that the variable "shapes" has 3 question mark signs on the first fields. What does it mean? This means that those parameters are arbitrary in size, meaning you can chose whatever value you want. The first value represents the number of images simultaneously processed by the Network, the second represents the height of the image, the next is the width of the image and the last is the number of channels. Three channels represent an RGB image. This next image has a representation of this.
Meaning of variable Shapes
The next thing we need is a set of images with objects and annotations about those objects on the images. In other words we need a set on which each image is associated with the information of the objects and their bounding boxes. This is what we call Dataset. The best approach here is to use a pre-existing Dataset with a lot of images and annotations as the results of the network will have a better chance of being accurate. One of the most famous Datasets is the COCO (Common Objects in COntext). This dataset has 80 classes (80 types of possible objects) and annotations for more than 118 thousand images! For this application this Dataset will be more than enough.
The download of the COCO dataset can be done on the official website on the [Downloads tab](https://cocodataset.org/#download). You want to download the "2017 Train images \[118k/18GB]" and also the "Train/Val annotations \[241MB]". You can use these links if you want:
{% embed url="" %}
COCO train images
{% endembed %}
{% embed url="" %}
COCO annotations
{% endembed %}
{% hint style="danger" %}
The Dataset is about 19GB in size so get ready to wait for the download and to make your computer's storage suffer.
{% endhint %}
After the painfully long download is complete, I recommend you store the images and annotations on a folder called "yolo\_dataset". Inside this folder you should store the images on a folder "images" and the file called "instances\_train2017.json" on a folder called "labels". The Dataset should be placed on the quantization folder of the repository!
COCO dataset
{% hint style="danger" %}
No no no no, don't open the folder with the images of the Dataset! Ubuntu will get slow and the folder will crash if you try to open it. It's too much images and the system doesn't handle them as well as Windows does.
{% endhint %}
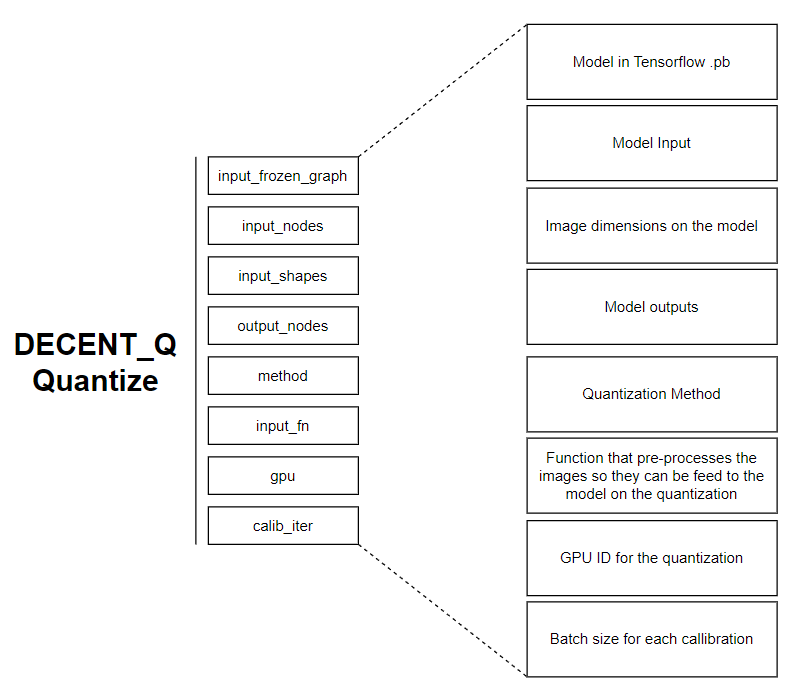
Well, now I think the important stuff is covered and we now can take a look at the quantization script. The following images helps to give you an idea of the necessary parameters for the script.
Quantization script scheme
The first parameter "input\_frozen\_graph" refers to the YOLOv3 model in Tensorflow. This model was copied to the quantization directory on the last chapter but we could indicate here the full path to it's location if it wasn't the case. The next parameters are "input\_nodes" and "output\_nodes" which correspond to the Neural Network input and output names we talked about earlier. On the "input\_shapes" we are just going to specify the size as 416x416 as it is very common, leaving the other values as default. The parameter "method" corresponds to the quantization method and it can be non-overflow or min-diffs being that the first might have worst results in case of outliers, the second one is the default option and the one we will use. "Input\_fn" is relative to a function that makes the pre-processing of the Dataset images so it can then send to the model on the right proportions. This function is based on the DNNDK examples but I stole it directly from [Wu-tianze work](https://github.com/wutianze/dnndk-pynqz2) as it is ready for our application.
Here is the quantization script completed as it should:
```
# activate DECENT_Q Python3.6 virtual environment
#conda activate decent
# generate calibraion images and list file
#python generate_images.py
# remove existing files
rm -rf ./quantize_results
# run quantization
echo "#####################################"
echo "QUANTIZE"
echo "#####################################"
decent_q quantize \
--input_frozen_graph ./yolo.pb \
--input_nodes input_1 \
--input_shapes ?,416,416,3 \
--output_nodes "conv2d_10/BiasAdd,conv2d_13/BiasAdd" \
--method 1 \
--input_fn graph_input_fn.calib_input \
--gpu 0 \
--calib_iter 100
echo "#####################################"
echo "QUANTIZATION COMPLETED"
echo "#####################################"
```
{% hint style="info" %}
There is the possibility to use GPU and make the process of quantization much faster but you would need to install other dependencies. I recommend you check the DNNDK v3.1 User Guide to see how you can do it. I apologize I couldn't test the GPU way because I don't have one and I didn't have time :cry:
{% endhint %}
Before executing the quantization, you will have to open the calibration function and change the path to the training dataset images according to your location. I'm assuming you only need to change the user name since I asked you to place the dataset on the right place.
Path to calibration images
All the necessary files are located on the repository and you probably won't need to change anything else, just make sure the Tensorflow model "yolo.pb", the calibration function and the dataset images are present on the quantization folder and you should be fine.
Quantization folder
Finally, to execute the quantization you simply run the command this commands:
cd ~
cd /home/andre/Desktop/YOLO-on-PYNQ-Z2/DNNDK/quantization
./quant.sh
{% hint style="warning" %}
The quantization process is very demanding and will take a long time considering the Dataset is enormous. For me it took 12 hours to finish but it might be faster according to your computer capabilities, specially if you have a GPU.
{% endhint %}
At the end of the process you probably had a nice night of sleep or you just went ride a bike down the mountain. What matters is there is a new file called "quantize\_results" which has two Tensorflow files representing the YOLOv3 model quantized. We will be needing only the "deploy\_model.pb".
Generated quantize files
The next step is to compile the model with a "DPU language" so I suggest you copy the "deploy\_model.pb" to the compilation directory of the repository.
```
cp /quantize_results/yolo.pb /home/andre/Desktop/YOLO-on-PYNQ-Z2/DNNDK/compilation
```